Welcome to Gritty Pet Co.
Your Canadian, specialty Pet Health & Wellness destination. 🇨🇦

Vet Reviewed & Approved
Dr. Ibrar A. is our veterinarian and a key member of our team. ✅
Facing a pet injury can be a stressful ordeal, filled with concern and the desire to provide the best care possible. In these moments, knowing how to apply a vet wrap correctly becomes invaluable. This guide aims to equip you with the essential knowledge to navigate pet wound care confidently, ensuring your furry friend's speedy recovery.
Key Takeaways
Proper Application is Crucial: Applying vet wrap correctly is paramount. Start with a clean, dry wound, layer with non-adherent padding, and wrap with enough tension to secure but not constrict. This balance supports healing while preventing discomfort or circulation issues.
Quality Matters: Not all vet wraps are created equal. Opt for reputable brands like 3M, Andover, and WildCow, known for their durability and breathability. The right vet wrap aids healing by keeping the wound protected yet ventilated.
Adaptation to Breed and Size: Tailor your vet wrap choice to your pet's size and the wound's location. Larger animals benefit from wider wraps for better coverage, while smaller pets may need narrower options for a snug fit.
Vet Wrap Basics

Step by Step Techniques for Applying Vet Wrap
- Initial Cleaning and Drying: Start by thoroughly cleaning the wound with a homemade saline solution or a diluted antiseptic to prevent infection. It's essential to ensure the wound and surrounding area are completely dry before applying the vet wrap to avoid slippage and bacterial growth.
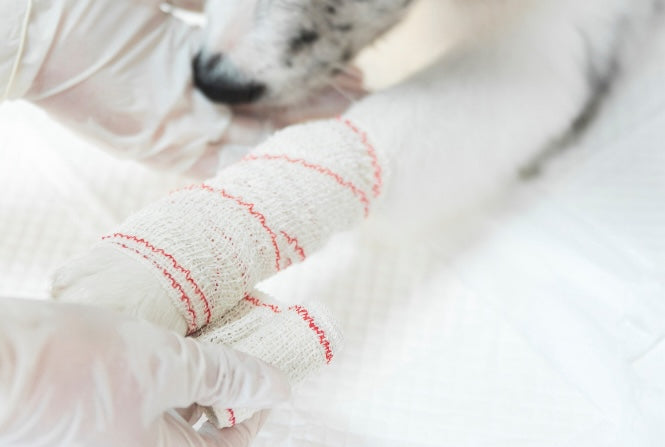
- Layering for Protection and Support: Apply a non-adherent pad or dressing over the wound for protection, followed by a layer of absorbent material if necessary. Begin wrapping with vet wrap, starting above the wound site and extending beyond it. Ensure each layer overlaps the previous one by about 50% for even pressure and coverage.
- Applying Vet Wrap with the Right Tension: The vet wrap should be snug but not too tight. A good rule of thumb is to be able to slip a finger between the bandage and your pet’s skin. This prevents cutting off circulation while ensuring the bandage stays in place.
- Securing the Wrap: Finish the wrapping process with either the self-adhesive properties of the vet wrap or secure it with medical tape if needed. Regular checks are vital to ensure the bandage hasn’t become too tight or loose.
- Monitoring and Adjustments: Regularly inspect the wound and bandage for any signs of infection, discomfort, or the bandage becoming wet or dirty. Replace the vet wrap as necessary, typically every 24 hours, or as advised by your vet.
Choosing Quality Vet Wrap
- Brand Reputation: Opt for reputable brands known for their quality and reliability in vet wrap products, such as 3M, Andover, and WildCow, which are popular among pet owners and veterinary professionals for their superior performance.
- Material and Elasticity: Look for vet wrap made from durable, nonwoven material that provides excellent elasticity and strength. This ensures the wrap provides adequate support and pressure without being too restrictive.
- Breathability: A good vet wrap should allow the wound to 'breathe.' This promotes healing by preventing moisture buildup under the bandage, which can lead to infection.
- Width and Length: Choose the correct width and length based on your pet's size and the wound's location. For larger dogs and horses, wider vet wraps (four-inch or more) are suitable, while smaller pets like cats may only need a one-inch or two-inch wrap.
- Adhesion: Quality vet wrap sticks to itself without adhering to fur, making it easier to apply and remove without causing discomfort to your pet. Ensure the wrap has consistent self-adhesive properties throughout its length for reliable application.

Additional Considerations
Breed-Specific Advice: For larger breeds or animals with thick fur, consider wider and more robust vet wraps to ensure the bandage holds up against movement and fur density. For smaller breeds or animals with sensitive skin, opt for softer, more flexible wraps that provide gentle compression.
Professional Consultation: Always consult with a veterinarian before attempting to wrap a serious wound or if you're unsure about the wrapping technique. They can provide guidance tailored to your pet's specific needs and health condition.
FAQ
1.How do I apply vet wrap to my dog's wound?
Start by cleaning the wound with saline or a diluted antiseptic solution. Then, dry the area completely. Apply a non-stick pad over the wound and secure it with vet wrap (1). The wrap should be snug but not tight; you should be able to fit a finger between the wrap and your pet's skin. For detailed steps, refer to Route 66 Veterinary Emergency & Critical Care's guide on basic wound dressing.
2: What should I include in my pet first aid kit for wound care?
Essential items for your kit should include non-adherent pads, cast padding, roll gauze, cohesive bandage material like vet wrap, and a pet-safe antiseptic solution. These supplies help ensure you're prepared to address wounds promptly and effectively.
3: How can I ensure the vet wrap stays in place and doesn't harm my pet?
To ensure the wrap stays in place, keep the injured paw dry and consider using a cone to prevent your pet from licking or chewing the bandage. The wrap should be applied with mild tension to avoid cutting off circulation. Regularly check for signs of too tight bandaging, such as swelling or discomfort.
4: Are there specific types of vet wrap that are better for certain pets or wounds?
Yes, vet wraps come in a variety of sizes and colors suitable for different animals and wound types. The choice of vet wrap may depend on the size of your pet and the location of the wound. Multicolored options can make the healing process a bit more cheerful for both pet and owner.
5: How often should I change the vet wrap on my pet's wound?
It's essential to change the vet wrap regularly to monitor the wound's healing process and ensure cleanliness. A general guideline is to replace the bandage every 24 hours or sooner if it becomes wet or dirty. Always follow your veterinarian's advice on bandage care and wound monitoring.
Top 3 YouTube Videos on Vet Wrap Techniques
1. How To Properly Apply Vet Wrap
A concise tutorial by Dr. Isabelle Kilcoyne, showcasing the correct method to apply vet wrap on animals, emphasizing common mistakes to avoid. Ideal for ensuring safe and effective application.
2. How to Wrap a Dog’s Paw Properly
This video focuses on bandaging a dog's paw, detailing each step to secure the bandage without causing discomfort, perfect for pet owners handling minor injuries at home.
3. EQUINE VET: How to Apply A Standing Wrap
Dr. Patrick Biegel explains how to apply standing wraps to horses, offering insights into equine care that could be beneficial for large pet owners seeking to understand wrap application better.
External Links for Further Reading
- Vet Advises - "How To Wrap A Dog's Leg For Sprain: A Step-by-Step Guide". Visit Site.
- Hepper - "How to Wrap a Dog Paw: 9 Vet Approved Tips". Visit Site.
- Today's Veterinary Practice - "Principles of Wound Care & Bandaging Techniques". Visit Site.
Conclusion
Vet wrap is an invaluable tool in pet wound care, offering a flexible, breathable, and supportive solution for treating wounds. By adhering to safety precautions, maintaining the bandage properly, and monitoring the wound for signs of healing or infection, pet owners can ensure their furry friends recover swiftly and comfortably.
Always remember, while vet wrap is highly effective for minor wounds and injuries, consulting a veterinarian for severe or persistent wounds is imperative. They can provide the necessary medical treatment and advice to ensure your pet's health and well-being.
By understanding how to use vet wrap effectively and recognizing when professional care is needed, pet owners can play a crucial role in their pets' recovery and overall health.
References
- 1. Campbell, B. G. (2006). Dressings, bandages, and splints for wound management in dogs and cats. Veterinary Clinics: Small Animal Practice, 36(4), 759-791.

